Showing posts with label snacks. Show all posts

October 29, 2015

more bento sandwiches

With a little creativity, day to day boring sandwiches can easily be turned into more colorful and fun bento box lunches :-) that may be made ahead and refrigerated until serving time.


Shown above, whole wheat bread sandwiches decorated with daisy cheese flower cut-outs. I just used yellow mustard for the center dots.


Ham and cheese sandwiches with rolled omelet and a colorful fruit mix for a well-balanced meal, shown above. Fresh lettuce leaves work great as dividers for the food. Colorful silicone muffin cups make ideal containers for the fruits and are flexible enough to fit inside most bento boxes. I like using this rectangular plastic food storage. They are roomy and deep enough for thick sandwiches.

ham sandwich and fruit bento lunch

October 28, 2015

panda bear jam sandwich


Here's a sweet panda bear sandwich idea that's so cute and adorable :-) It was my first time to test another bento accessory, a panda shape sandwich cutter that I recently ordered from BentoUSA.


At first I was disappointed that it didn't work very well with my homemade bread. I was making a big mess with the crumbly bread until I thought about using a rolling pin to flatten the bread a bit. It turned out to be an important step. It was much easier to make neater cuts on the flattened bread. First, cut two pieces of bread using the panda shape cutter (which doubles as a rice molder too). Then with the other cutter, punch out the eyes, nose etc. Spread with blueberry jam then sandwich together.

this set comes with a rice molder and sandwich cutter

October 20, 2015

cauliflower crust pizza

It has happened many times in the past when a new food craze shared online by avid food enthusiasts became so noticeably popular to grab attention. This cauliflower crust idea was one of them.


We've always enjoyed all kinds of vegetables so I was curious about this new technique and recipe. I had my doubts but I just had to try it and see.


In a food processor, finely chop the cauliflower. Drain well or squeeze as much water as possible from the chopped cauliflower using a clean kitchen towel. Tossing the chopped cauliflower with a little salt will also help draw out moisture from the cauliflower. Transfer to a bowl then add 2 beaten eggs, 1/2 cup shredded Italian cheese, 1 teaspoon Italian seasoning and 1/4 teaspoon salt. Mix well. Spread out the mixture on a pizza pan lined with parchment paper. Lightly grease the parchment with non-stick baking spray. Bake the crust for about 30 minutes or until lightly toasted. Remove from the oven. Evenly spread Alfredo sauce on top then sprinkle with more cheese. Return to the oven and bake until the cheese is melted and bubbly. This tasty recipe was adapted from Crockpot Gourmet's Deep Dish Cheese Pizza with Cauliflower Crust. Other favorite pizza toppings will be just as good.

lightly toasted cauliflower crust ready for the toppings

The mystery of the cauliflower crust no longer haunts me :-) Again, it has been proven that the popularity of certain food ideas should never be taken for granted. There's a reason why they're popular. Oftentimes, they're worth trying.

September 15, 2015

more cake donuts

Here are a few more baked cake donuts to brighten up our day :-)

vanilla and nutmeg with glaze and sprinkles

chocolate and vanilla with shiny powdered sugar glaze

chocolate with chocolate glaze :-)

extra moist with pumpkin in the mix

hot coffee and warm donut...the best combination

pumpkin donuts dipped in butter and sugar

August 16, 2015

baked cinnamon cake donuts

Baked instead of deep-fried, these donuts turned out light, moist and full of cinnamon flavor! My husband actually prefers cake donuts more than the other yeast-raised variety. I'm glad he bought this pan so we could try it :-)


The non-stick donut pan worked quite well and produced such perfectly shaped treats. I still sprayed each ring mold with baking spray just to make sure they would not stick. They all slid out of the mold easily. Brushing them with oil or melted butter and coating them evenly with flour using a small fine sieve will do the trick as well.


I just love the donut pan :-) It was fun to make donuts the healthier way with absolutely no messy oil to deal with. The shelf life was much better than those that were deep-fried which tend to dry up fast. Any muffin recipe will translate well. I used a simple recipe for Doughnut Muffins that I found long ago. There's a recipe for Pumpkin Donuts at the King Arthur Flour website that I also would like to try next time.


For the recipe...

May 31, 2015

weekend sandwich idea

Every now and then, usually on weekends, I throw caution to the wind and just succumb to the most comforting guilty pleasure meal like this loaded BLT/clubhouse sandwich we recently had at home :-)


I've never turned down a BLT sandwich and I've never had one that I didn't like either. I have to admit, it's one of my classic favorites. This wasn't totally unhealthy with the addition of avocado :-) The sandwich was definitely an oversized stack of crispy bacon, mortadella, havarti cheese, tomato and avocado slices.


I had no problem finishing it :-) It was exceptionally good with chewy La Brea telera rollsNot available in grocery stores in our area, the rolls have always been a special treat when we get them.

April 28, 2015

lunch ideas for weekdays

I've been trying to think of more creative but not too complicated lunch options now that my husband has been coming home for lunch everyday. Last year, his office moved to a better and more convenient location that's very close to our home. Shown below are some lunch ideas I've made recently.


Whole wheat clubhouse sandwiches with scrambled egg, sliced ham, Swiss cheese and dijon mustard, shown above. I found the best 100% whole wheat bread recipe from the King Arthur Flour website that  I bake often. I make it with either molasses or honey but the molasses gives it a darker color and a deeper flavor.


A simple and light omelet made with sauteed mushrooms and grated cheese, shown above. I also make a lighter version with chopped tomatoes and spinach.


For the creamy pasta shown above, cook 1 cup shell pasta then drain. Brown sliced sausage in a skillet then add 1/4 cup chopped red onions and 1-2 cloves of minced garlic. Sprinkle with 1/2 teaspoon Italian seasoning, salt and pepper to taste. Toss in the cooked pasta with a little of the pasta water. Add some frozen peas if desired. Remove from heat then mix in about half a cup of sour cream. Stir until well mixed. Garnish with chopped fresh parsley.

February 15, 2015

desserts for Valentine's Day

There are many ways to make Valentine's Day memorable. A day of relaxation, a leisurely walk in perfect spring-like weather and simply enjoying quality time together made our Valentine's Day this year quite special. It was also a good opportunity for me to make desserts! I've been curious about these 3D Hearts Cupcakes since I saw them featured on a tv show recently. I think the 3D idea is genius. So off to YouTube I went and as always, I found answers to my questions. After watching the cute video by Ann Reardon, I couldn't wait to give it a try.


The taste of the cupcakes may be improved by replacing the water in the recipe with fruit juice and adding more flavorings. I didn't bother frosting them as I was more interested with the process of making them. Most of the hearts didn't turn out perfectly shaped but it was fun making them :-) The hearts will also look nice in pastel colors. 


The recipe makes smaller size cupcakes but with enough frosting, they will look adorable on the dessert table at parties and other appropriate events.


Shown above (1) the 3D hearts, looking like small marzipan strawberries, were shaped using crumbled cupcakes mixed with a little red food coloring (2) two tablespoons of cupcake batter baked for about 5 minutes with 3D hearts placed in the center (3) the cupcakes from the oven, after covering the 3D hearts with more batter and baking for another 10 minutes (4) the cupcakes cut in the middle to show the heart shapes.


Another dessert I made post-Valentine's Day was Cathedral Windows Gelatine, shown above, which is popular in Manila. It's usually made with a combination of colorful gelatine, supposedly to resemble the stained glass art in gothic cathedrals and churches. However, I only had two boxes of gelatine, cherry and strawberry flavors, that are both red. They were exactly the colors I needed for Valentine's Day :-) The marbling effect wasn't intentional but my husband had very favorable comments when he saw it.


Make ahead assorted colors of gelatine and cut them into 1" squares. The creamy gelatine was supposed to cool down and allowed to thicken in the fridge for a few hours before mixing in the pre-made cubes of colorful gelatine. Since I was using only red gelatine, I went ahead and arranged the squares in a plastic mold. I cooked the creamy gelatine mixture in a small pot then, without letting it cool down, I carefully spooned the hot mixture directly over the red cubes of gelatine. The hot mixture melted some of the red cubes of gelatine resulting in a marbled effect. It was an error that didn't turn out so bad after all. I have to try this using other colors next time.

cross section of the Cathedral Gelatine dessert, served with strawberries
Happy Valentine's Day!
For the recipe...

November 15, 2014

calamansi marmalade

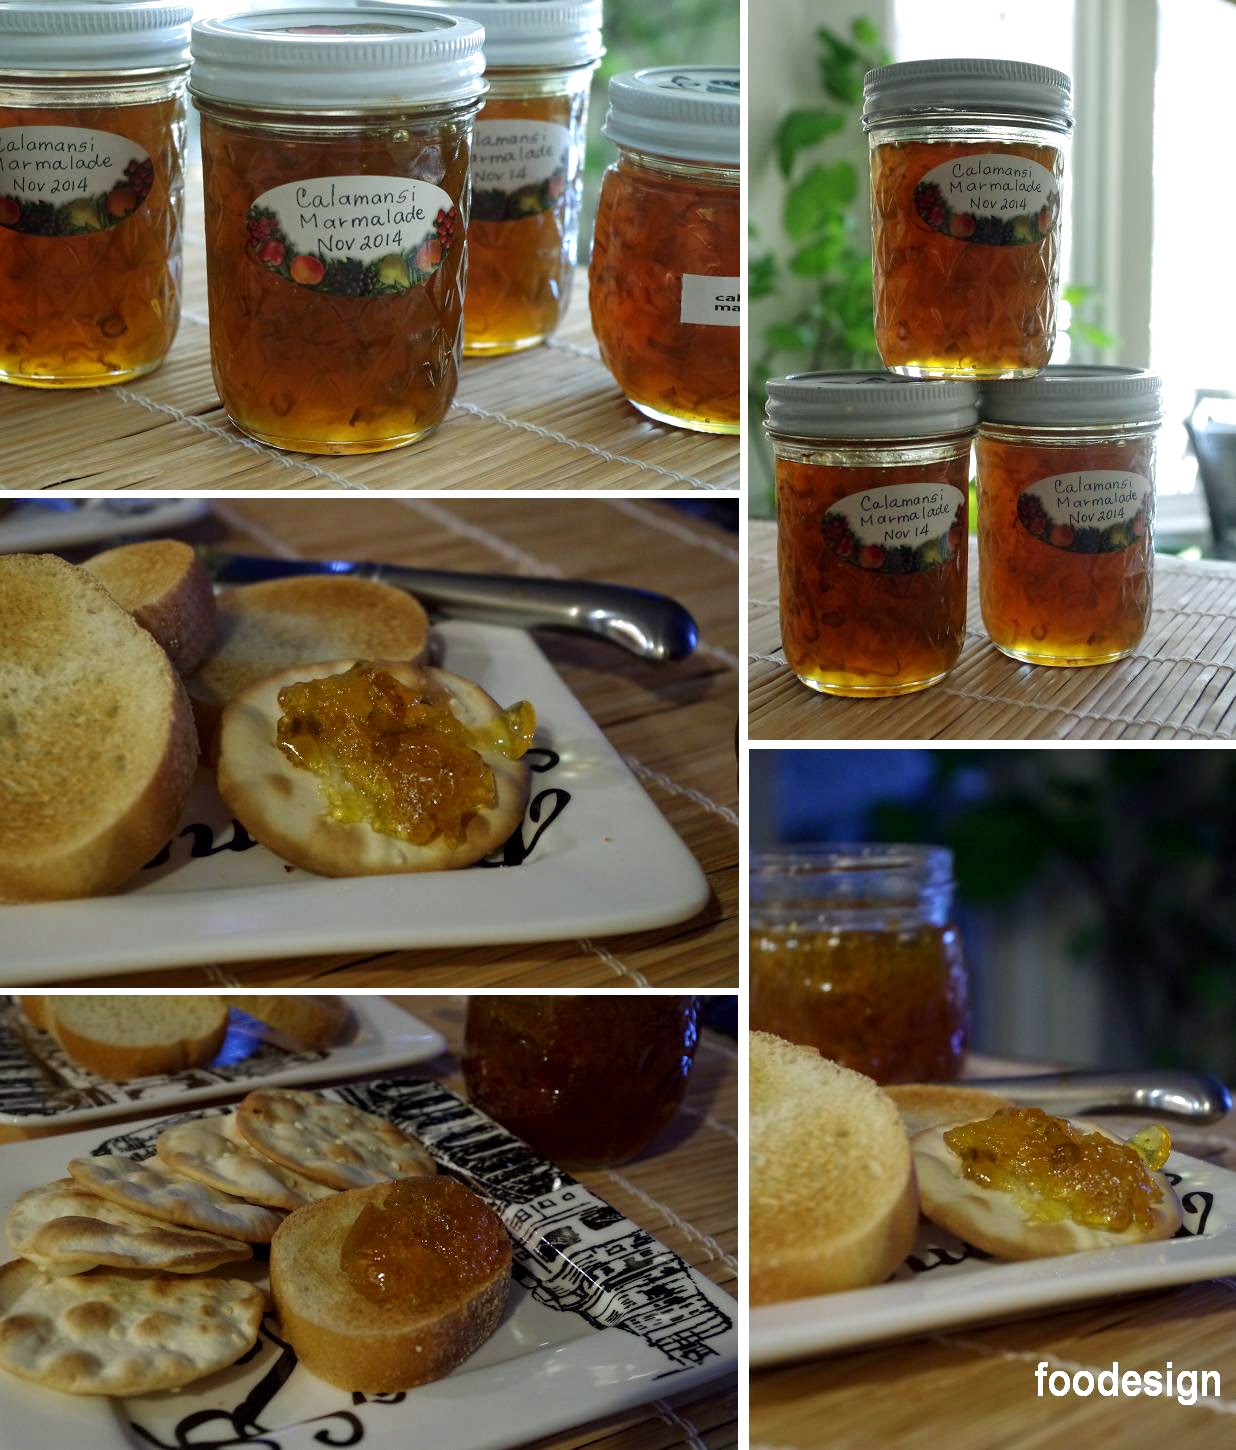
Below are pictures and notes documenting my calamansi marmalade project from start to finish. Having harvested a bunch this year before the onset of cooler weather, I thought it would be a good opportunity to try making marmalade with them. I found a few helpful tips and recipes from other foodblogs and websites I read which served as my guide.


The finished product taste test as shown above. The canning jars, lids and rings were washed thoroughly with warm soapy water then sterilized in boiling water for 10-15 minutes before using. I let them air dry on a wire rack while cooking the marmalade. Served with some crackers and toasted slices of French bread, the calamansi marmalade had a good balance of sweetness and citrus flavor with a slight bitterness from the strips of calamansi peel. The distinct calamansi flavor in this marmalade was unlike any other citrus marmalades I've tried.

washing the calamansi under running water


Using a small knife, slice and juice the fruits removing the seeds (above). I separated the segments from the peel, however, this step is optional. Slice the peel into strips next. I later found out that it was better not to slice the peel too thinly as they almost melted while cooking. Add 3/4 cup of water to every cup of fruit. I simmered the juice with the peel and the pulp segments in two separate pots for 10-12 minutes. Then I strained the pulp into the juice to get maximum pectin. Refrigerate the mixture preferably overnight.


The next day, pour the refrigerated mixture into a bigger pot before adding the sugar. The bigger pot ensures that the mixture doesn't boil over during the cooking process. Add 1 cup of sugar to every cup of the mixture. A tablespoon of butter may be added to prevent foaming. I learned that a candy thermometer is most helpful to precisely determine the correct temperature (ideally 220F) for the marmalade to properly set. The calamansi fruits contained lots of pectin eliminating the need for Sure Jell, a dry pectin product used for jam and jelly making.

the jars all filled up with the hot mixture


Hand tighten the lids and rings onto the jars then process them in boiling water bath for 10-12 minutes, as shown above. Using a jar lifter gadget, carefully transfer the hot jars to a towel-lined tray or cutting board. As the jars start cooling down, they will pop and seal. Jars that didn't seal properly must be refrigerated. Sealed jars may be stored in the pantry.


Homemade marmalades and jams make great gifts from the kitchen for the coming holiday season. Label them with the date they were made then wrap them in clear cellophane, as shown in the example above. Tie with a pretty ribbon or raffia.

October 20, 2014

calamansi muffins

Bright sunny days make me think of these citrusy muffins. I usually make them with lemons but now that we're having a steady supply of calamansi, I thought about using them instead of lemons in the recipe. Do not underestimate these tiny citrus fruits when it comes to flavor and juice content :-) They're extra juicy with a good balance of tartness and sweetness.


As soon as these muffins came out of the oven, I dipped the tops in melted butter then quickly rolled them in sugar forming a crust, as shown in the pictures below.


The highlight of every bite was the calamansi flavor which was as bright as the sunshine outside :-) These muffins will surely be a nice breakfast or snack treat for citrus lovers out there. I'm thankful for warm summer days and for our yearly fresh calamansi supply. I look forward to another harvest season next year.

For the recipe...

September 23, 2014

glazed Italian cookies

There was an "instant party" feeling the minute I started glazing these cute cookies and topping them with pastel-colored candy sprinkles :-) 

I think I should rename them happiness cookies


These were supposed to be anisette cookies but I ran out of anise flavoring so I substituted amaretto flavoring instead. It has been awhile since I made them and this week, I was craving Italian cookies so I thought about baking them.


They can be left simple and plain without the powdered sugar glaze but the glazed cookie wins everytime in our taste test at home. It just brings them to another level and even with the added glaze and the sprinkles they're still not super sweet.


The never-fail recipe makes delightful delicate round cookies with crispy edges and cake-like interior. These cookies are so addictive that it's impossible to eat just one :-) They make my tea time so much more enjoyable!

GLAZED ITALIAN COOKIES (Anisette Cookies)

3/4 cup shortening (I combined 1/4 cup butter & 1/2 cup Crisco)
1 cup sugar
3 eggs
3 cups flour
4 tablespoons baking powder
pinch of salt
2 teaspoons anise or amaretto flavoring

Preheat oven to 350F. Combine flour, baking powder and salt in a bowl. Set aside. Cream together shortening and sugar for about 5 minutes or until light and fluffy. Add the eggs one at a time. Continue mixing until mixture is smooth. Add the flavoring. On low speed, gradually add the flour mixture and mix until just blended. Measure the dough using a small ice cream scoop or tablespoon then form into balls. Arrange them about 1" apart on a baking sheet lined with parchment paper. Flatten slightly. Bake for 10-12 minutes or until edges are lightly browned. Makes about 45 cookies. Let the cookies cool on a wire rack. Spread with powdered sugar glaze. Decorate with your choice of colorful candy sprinkles.

For the powdered sugar glaze, just mix sifted powdered sugar with a little water to make a spreadable glaze. I've tried a recipe using melted butter and milk but this simple powdered sugar and water combination worked for me.

cross section reveals the light cake-like crumb
the cookies look cute inside a covered cake pedestal